This "How To" should guide you through setting up an Identi.ca account on Seesmic for Android in three easy steps. I'm told that Seesmic for iPhone and Blackberry have similar settings so it may work in the same way there.

Identi.ca is an open source social networking and micro-blogging service. While similar to Twitter in both concept and operation, Identi.ca provides many features not currently implemented by Twitter, including XMPPsupport and personal tag clouds. In addition, Identi.ca allows free export and exchange of personal and "friend" data based on the FOAF standard; therefore, notices can be fed into a Twitter account or other service, and also ported in to a private system similar to Yammer.
I find Identi.ca is a great micro-blogging service, and usually post my status updates there. Identi.ca then posts my status to Twitter and Google Buzz pulls the status update from Twitter. To simplify things: I post once to Identi.ca, and maintain a presence on three separate social networks. [I deleted my Facebook account earlier this year, but you can set up Twitter to push your status to Facebook as well].

Seesmic For Android is a native microblogging client, that supports Twitter and Google Buzz. If this tutorial is successful you should be able to use Identi.ca from the Seesmic application too. [Seesmic is also available for Windows Phone 7, iOS and Blackberry on mobile devices, as well as for computer desktops and as a web client]
Before starting this "How To", there are a few things you should have set up:
- An Android phone with Mobile Data / WiFi
- The Seesmic for Android application [Available in the Android Market and from Seesmic]
- An Identi.ca account [Register here]
I hope this tutorial makes sense and is easy to follow. Please let me know if there are any problems with it through the comments section at the end of the post, thanks!
Step One: Open The Seesmic for Android Application
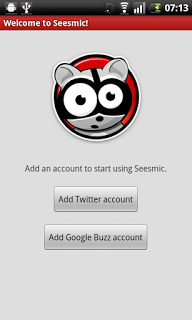
You should be presented with a screen like this if you have not used Seesmic before and have no accounts set up. Proceed by tapping the "Add Twitter account" onscreen button.
If you are already using Seesmic for Twitter and/or Google Buzz: [ Menu > Accounts > Add Account > Add Twitter account ]
Step Two: Enter Your Identi.ca Credentials
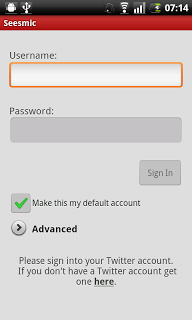
Enter your Identi.ca username and password, but DON'T sign in. Tap the "Advanced" drop down menu button under the "Make this my default account" tick-box.
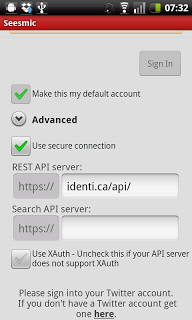
Step Three: Set Up the Identi.ca REST API server Details

Under "REST API server" option type in identi.ca/api/ as shown in the picture above.
Then untick the tick-box called Use XAuth. Your final screen should look like this:
All done! You should now be able to sign in and use your Identi.ca account through the Seesmic for Android client. Enjoy!