how to

Android KitKat (4.4.2) on the Huawei G300

I pulled my Huawei G300 out of the drawer today and did a bit of long overdue tinkering.
My Huawei Ascend G300 running CyanogenMod 11
After updating the custom recovery, and installing the CyanogenMod nightly build and the minimum Google Apps package I have a fully functioning KitKat device.

My impression is that the device is snappier and more responsive, and all the usual day to day apps work great. I now just have to choose which sim card to pop into the device.

Thanks to Dazzozo, the CyanogenMod community and the MoDaCo forums for enabling me to make an older cheap device much more useful, long after Huawei and Vodafone started pretending the device doesn't exist.

You can get everything you need to update your Huawei G300 from here.

As usual, feel free to leave comments and/or feedback in the comments section below.

How To Have the KitKat Launcher On The Galaxy Nexus

Google have announced that the Galaxy Nexus won't be getting Android 4.4 KitKat. The teardown of the Nexus 5 factory image gives us the bits we need to have some of the KitKat tastiness on the Samsung made Galaxy Nexus. This quick tutorial gives you the new Google Play Services, Google Search, and the Google Launcher. I am not to be held responsible for any damage to your phone, you, the space-time continuum or anything else. I would like to add that I am not responsible for the lack of recent Rachel Stevens albums either.
You can have this KitKat crumb, but not the whole thing.
You will need to download and install the new Google Play Services first. You can download it from here.

Next, download and install the new Google Search (Now). It is available from here.

Finally, download and install the new Launcher. You can get that here.

Once you have done that, press the home button and then select the blue Launcher icon and select "Always".

That should be it! Enjoy the KitKat crumb while the newer Nexus devices get the full chocolatey experience.

If you have any questions or comments, feel free to pop them below.

Enjoy the bigger icons and app drawer!

How to use torrent files

A friend asked me to explain how to use torrent files to download "stuff" from the internet. I use torrents a lot to download and then share Linux distros, so I thought I would write a quick "how to" here on Todoleo.com.

Torrent files are the files that enable you to download and share content using the BitTorrent peer-to-peer file sharing system.The torrent file speaks to a client and tells it how to connect to other users just like yourself who are downloading or have downloaded the same content.

To use torrent files, you'll need to download a client, a programme that does the work of connecting to the peer-to-peer network. I use uTorrent and shall base this how to around that.

A quick disclaimer before I go any further: using torrent files is not illegal, but depending on the content itself you are downloading you may be breaching someone's copyright. I will not be held responsible for what you do with torrents and the internet. Mmmmmkay?

Right, first things first, you'll need to download uTorrent from 
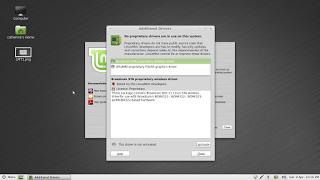
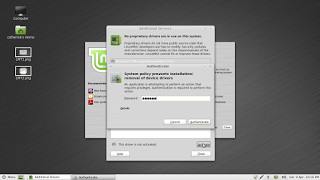
uTorrent.com. Go for the free version, it is more than enough. Go ahead and install the programme, but beware not to get caught out by whatever bundled bloatware they try and give you with it. In my case there were a couple of things I had to opt out of, as in the screenshots below.
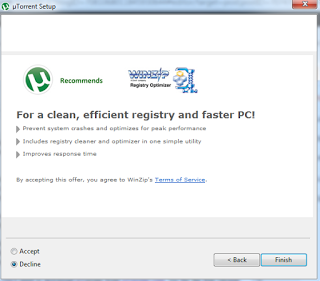
No thanks, don't want this...
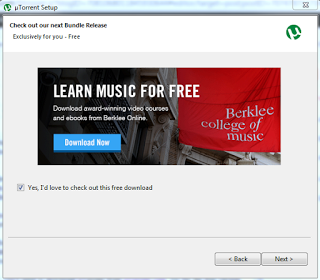
...or this.
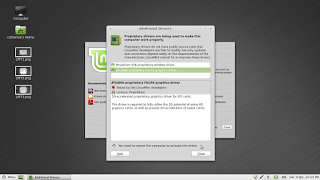
Once the installation is done, uTorrent should open itself and be ready to use. That means the client (uTorrent) is there.
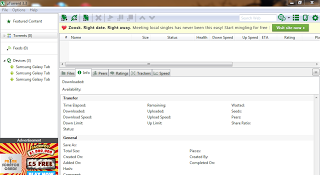
This is more or less what uTorrent looks like once it is running.
Now you'll need to go and get a torrent file that allows you to get the content you want from the interwebs. I use a metasearch engine called Torrentz.eu. Torrentz.eu takes my search and submits it to lots of different torrent sites and search engines and puts all the results together. Think of Torrentz.eu as the Google of torrent files.
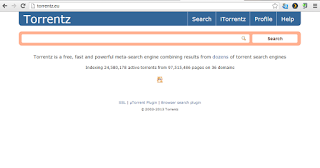
Torrentz.eu
Search for what you are looking for (in my case Ubuntu 13.04) and it will take you to a results page. The results page lists the files and content that match my search.
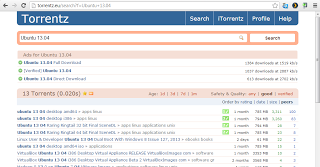
Torrentz.eu results page
I see that in my case the second result is the file appropriate for me (Ubuntu 13.04 desktop i386) so I click on the link. In the next page I will see a selection of sites where I can get the torrent file from.
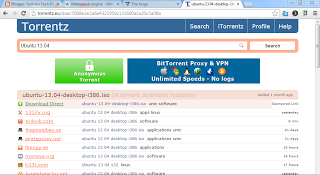
Links to sites that have the torrent file I am looking for
It is important to note that some of these sites may be blocked by your internet service provider, due to copyright infringement issues and a lack of real freedom on the internet. [insert net neutrality rant here].
Select a provider of the torrent file (I usually use Monova.org), and go through to the website and download the .torrent file.
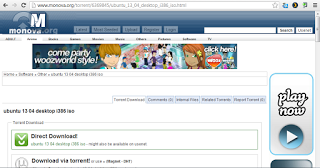
Monova.org
Once the .torrent file has downloaded (usually within a few seconds), you can double click on it and it should be opened in uTorrent. Confirm that you would like to add that torrent file and it will be added to your download list and the content will be on your computer after it has finished downloading.
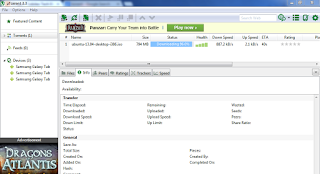
Almost there!
It is important to note that as you are downloading the content, you are also uploading it to others. The more people are downloading or have downloaded the content and left their client running, the faster the download will be.

I hope this tutorial has been useful to you. If you need any more help or have any questions feel free to ask in the comments section below. Happy torrenting!

How To Get WiFi Working on a Dell 1120 in Linux Mint 10

I was setting up Linux Mint on my aunt's Dell 1120 earlier this evening and was amazed by how easy it is to get everything working even though it involves freedom hating (proprietary) drivers.


The reason I was setting up Linux Mint on this machine for my aunt is the ease of use of Linux Mint for people who are not too comfortable with computers. I dare say that it was so easy my auntie could have done it herself.

What You'll Need To Follow This Tutorial

  • A Dell Mini 1120 or similarly specified AMD Vision chipset machine.
  • Linux Mint 10 installed and updated on the above mentioned computer.
  • Access to a modem/router with a network cable.
  • A working internet connection on the above mentioned modem/router.
  • 10-20 minutes of time depending on the speed of your internet connection.


Step One

If your machine has Linux Mint 10 installed and updated, and your computer is plugged into the modem/router with a working internet connection, you should be seeing something like this:


Click on the Menu button in the bottom right left hand corner of the screen and then click in the search box in the menu pane that pops up. Start typing in "Additional Drivers". Before you have finished typing in "Additional Drivers" you should be given the option of a program called "Additional Drivers" above the search box. Go ahead and click on it. You should then get a window open up like this:

Step 2

Click on the first driver that is in the new window that is entitled Broadcom STA proprietary wireless driver and then click on the Activate button second last to bottom right of the same window. A new popup window should appear telling you that the driver is downloading and installing. Don't panic, that is what is supposed to happen.

Once the download and installation has finished, the driver at the top of the window should have a green light next to it. If it does, you have successfully installed the wireless driver on your Linux Mint machine.

Step Three

Click on the second driver called ATI/AMD proprietary FGLRX graphics driver. As with the wireless driver, click the Activate button. The driver will download and install. When the driver has been downloaded and installed, you will be prompted to restart your computer to activate the driver.

Step Four

Restart your computer and then everything should be working.

Feel free to post questions and/or comments and let me know how you get on.

How To: Set Up Identi.ca On Seesmic For Android

This "How To" should guide you through setting up an Identi.ca account on Seesmic for Android in three easy steps. I'm told that Seesmic for iPhone and Blackberry have similar settings so it may work in the same way there.


Identi.ca is an open source social networking and micro-blogging service. While similar to Twitter in both concept and operation, Identi.ca provides many features not currently implemented by Twitter, including XMPPsupport and personal tag clouds. In addition, Identi.ca allows free export and exchange of personal and "friend" data based on the FOAF standard; therefore, notices can be fed into a Twitter account or other service, and also ported in to a private system similar to Yammer.

I find Identi.ca is a great micro-blogging service, and usually post my status updates there. Identi.ca then posts my status to Twitter and Google Buzz pulls the status update from Twitter. To simplify things: I post once to Identi.ca, and maintain a presence on three separate social networks. [I deleted my Facebook account earlier this year, but you can set up Twitter to push your status to Facebook as well].


Seesmic For Android is a native microblogging client, that supports Twitter and Google Buzz. If this tutorial is successful you should be able to use Identi.ca from the Seesmic application too. [Seesmic is also available for Windows Phone 7, iOS and Blackberry on mobile devices, as well as for computer desktops and as a web client]

Before starting this "How To", there are a few things you should have set up:

  • An Android phone with Mobile Data / WiFi
  • The Seesmic for Android application [Available in the Android Market and from Seesmic]
  • An Identi.ca account [Register here]
I hope this tutorial makes sense and is easy to follow. Please let me know if there are any problems with it through the comments section at the end of the post, thanks!

Step One: Open The Seesmic for Android Application


You should be presented with a screen like this if you have not used Seesmic before and have no accounts set up. Proceed by tapping the "Add Twitter account" onscreen button. 

If you are already using Seesmic for Twitter and/or Google Buzz: [ Menu > Accounts > Add Account > Add Twitter account ]

Step Two: Enter Your Identi.ca Credentials


Enter your Identi.ca username and password, but DON'T sign in. Tap the "Advanced" drop down menu button under the "Make this my default account" tick-box.

Step Three: Set Up the Identi.ca REST API server Details


Under "REST API server" option type in identi.ca/api/ as shown in the picture above.

Then untick the tick-box called Use XAuth. Your final screen should look like this:


All done! You should now be able to sign in and use your Identi.ca account through the Seesmic for Android client. Enjoy!