Dell

How To Get WiFi Working on a Dell 1120 in Linux Mint 10

I was setting up Linux Mint on my aunt's Dell 1120 earlier this evening and was amazed by how easy it is to get everything working even though it involves freedom hating (proprietary) drivers.


The reason I was setting up Linux Mint on this machine for my aunt is the ease of use of Linux Mint for people who are not too comfortable with computers. I dare say that it was so easy my auntie could have done it herself.

What You'll Need To Follow This Tutorial

  • A Dell Mini 1120 or similarly specified AMD Vision chipset machine.
  • Linux Mint 10 installed and updated on the above mentioned computer.
  • Access to a modem/router with a network cable.
  • A working internet connection on the above mentioned modem/router.
  • 10-20 minutes of time depending on the speed of your internet connection.


Step One

If your machine has Linux Mint 10 installed and updated, and your computer is plugged into the modem/router with a working internet connection, you should be seeing something like this:


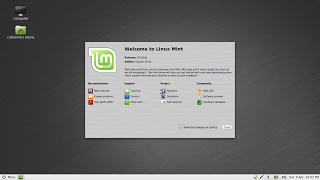
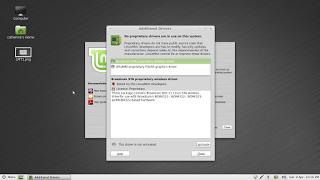
Click on the Menu button in the bottom right left hand corner of the screen and then click in the search box in the menu pane that pops up. Start typing in "Additional Drivers". Before you have finished typing in "Additional Drivers" you should be given the option of a program called "Additional Drivers" above the search box. Go ahead and click on it. You should then get a window open up like this:

Step 2

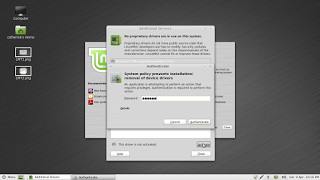
Click on the first driver that is in the new window that is entitled Broadcom STA proprietary wireless driver and then click on the Activate button second last to bottom right of the same window. A new popup window should appear telling you that the driver is downloading and installing. Don't panic, that is what is supposed to happen.

Once the download and installation has finished, the driver at the top of the window should have a green light next to it. If it does, you have successfully installed the wireless driver on your Linux Mint machine.

Step Three

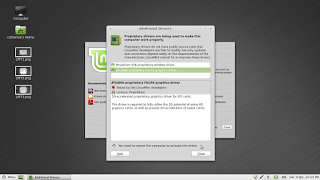
Click on the second driver called ATI/AMD proprietary FGLRX graphics driver. As with the wireless driver, click the Activate button. The driver will download and install. When the driver has been downloaded and installed, you will be prompted to restart your computer to activate the driver.

Step Four

Restart your computer and then everything should be working.

Feel free to post questions and/or comments and let me know how you get on.

How To Get WiFi Working On A Dell Mini 1018 [Ubuntu]

I recently had a problem setting up a netbook with Ubuntu 10.10 Linux for a relative.


Installing Ubuntu 10.10 Maverick Meerkat Netbook Edition wasn't a problem, and everything worked fine except for wireless networking. Trawling through Dell and Ubuntu forums to find the solution was tough, but I eventually got to the bottom of it.

Before I go any further, I must underline a few details: 
  • the Dell Mini 1018 netbook was purchased in the UK
  • the wireless card uses Realtek drivers (not Broadcom ones)
  • solving the problem involves a small amount of terminal use
I'll assume you have installed Ubuntu on your machine and have plugged it into a router to gain internet access. (Without internet access this tutorial won't work). 

Before starting please update Ubuntu using the Update Manager.

Step One: Open A Terminal Window


Open a Terminal window (usually found in "Accessories" or "Applications")


Step Two: 

Copy and paste the following text into the command prompt:


sudo add-apt-repository ppa:lexical/hwe-wireless

You will be prompted to enter your "root" or "administrator" password. Go ahead and wait for the terminal gobbledygook takes you back to a command prompt.

Step Three:

Copy and paste the following text into the command prompt:

sudo apt-get update

Again, you may be prompted to enter your "root" or "administrator" password. As in the previous step, go ahead and wait for the terminal gobbledygook takes you back to a command prompt.

Step Four:

Now, copy and paste this last bit of text into the command prompt:

sudo apt-get install rtl8192ce-dkms

Again, you may be prompted to enter your "root" or "administrator" password. As in the previous step, go ahead. You might be prompted to confirm that you want to install a file. enter "Y" on your keyboard and then hit "Enter" on your keyboard. Now wait for the terminal gobbledygook takes you back to a command prompt.

Last Step (Hopefully): Restart Ubuntu

Now all you have to do is restart your computer and Wireless Networking should be working fine.

Thanks go to Keng-Yü Lin who provided the repository and did all the hard work to make this possible in a relatively pain free manner (https://launchpad.net/~lexical), and the friendly people at the Ubuntu Forums.